Anthropologie Knock-Off w/ Simplicity 2560
Ever since I saw Suzannah's post about Simplicity 2560 over at Adventures in Dressmaking, I've been anxious to try out the pattern. I'm quite certain I could own a shawl-necked cardi in every color of the rainbow and never get tired of them.
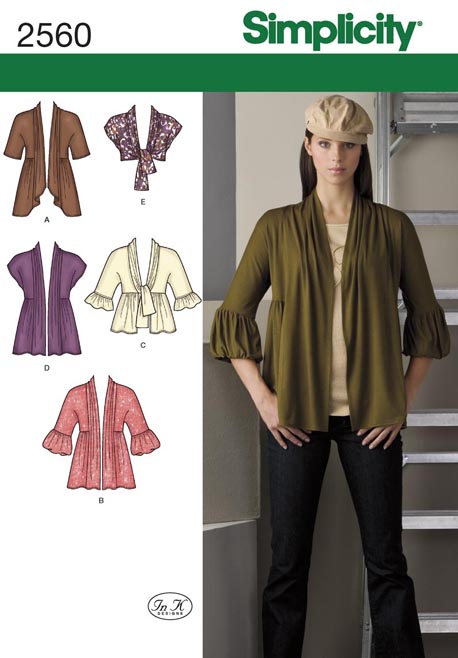
First, I tried out the pattern in a straight forward manner. I made a grey cardigan with View D, and followed the directions exactly. I cut a size 14 so that all the drape of the shawl neck would be in the center. I could probably stand a little smaller if I wanted to wear it more open. In any case, the result was a comfy cardigan that can be dressed up or down:


I particularly love the way the sleeves on this pattern fit me, so I'm guessing I'll be using it as the base for many shrugs, cardigans and tops.
Next, as I was searching the internet for DIY Maternity clothing, I happened upon Miriam's tutorial for a maternity dress inspired by an Anthropologie top. I like tops more than dresses, and I tend to wear them more, so I headed on over to Anthro's website to check out the inspiration piece:


I feel like many might pass up this pattern because the outfit on the model looks a little dated. But if you can get past that, it is a great little pattern.
First, I tried out the pattern in a straight forward manner. I made a grey cardigan with View D, and followed the directions exactly. I cut a size 14 so that all the drape of the shawl neck would be in the center. I could probably stand a little smaller if I wanted to wear it more open. In any case, the result was a comfy cardigan that can be dressed up or down:


I particularly love the way the sleeves on this pattern fit me, so I'm guessing I'll be using it as the base for many shrugs, cardigans and tops.
Next, as I was searching the internet for DIY Maternity clothing, I happened upon Miriam's tutorial for a maternity dress inspired by an Anthropologie top. I like tops more than dresses, and I tend to wear them more, so I headed on over to Anthro's website to check out the inspiration piece:
Super cute, and could be maternity friendly. As a bonus, the low neck makes it nursing friendly later on! My shawl neck cardigan pattern was just waiting to be adapted. Here's a mock up of what I intended to make, complete with my fabric:

Here are my altered instructions:
My Materials:
about 2(ish?) yards of semi-sheer yellow striped jersey knit
Some 3/8" elastic
Sewing machine with stretch stitch
Simplicity 2560 Pattern
Blank newsprint
Yellow thread
1. My pattern has an empire waist all the way around, and I wanted to remove the gathers in the back. So, I converted the back bodice/sleeve and back pieces into one piece:

2. Since step 1 removes the need for a seam, thus lengthening the pattern a bit, I added a seam allowance to the front bodice/sleeve and front pieces, as well as the neck band:

3. I cut the pattern pieces for View D - front bodice, front, back (my altered version), and neck band - as well as 2 rectangles that were about 7.25" x 20" to make the twist pieces. I actually made these narrower at first, but didn't like them so I went back and cut new ones.
4. Gather lower front pieces between notches (I used 3/8" elastic to do this rather than a gathering stitch).
 |
| I cut the elastic longer than necessary to give me something to hold onto while I stretch the elastic and zig-zag it to the fabric. |
5. Pin lower front to front bodice/sleeve, matching notches, and stitch.


6. Pin front to back at shoulder seams only (not side seams), and stitch. Press seam open.

7. Pin two neck band pieces together along short side and stitch. Press seam open.
8. Pin neck band to shirt: Start in the center back of the back bodice, matching small and large dots to shoulder seams and empire waist seam. Here is what it should look like once this step is done. The neck band is the part I'm holding out with my left hand.

9. Sew front center seam along edge of neck band to desired length. I made mine stop about even with the empire waist seam, so the shirt is very low necked. I will wear a camisole underneath, but I wanted it to be usable as a nursing shirt later.

10. Press remaining edge of neck opening under, and hem if desired (I just pressed, we'll see how it does after washing)

11. Add elastic to the seam at the nape of your neck, if desired (makes it gather more naturally, with less fiddling).

12. Using the two small rectangular pieces, fold in half and sew to make a tube. Turn right side out and press flat. These will be your two waist band pieces.
13. Intertwining the two, pin waist bands to shirt front, matching edges with empire waist seam.

14. Pin front to back, making sure to catch your waist bands in the seam, and stitch. Stop the seam at large dot to leave sleeve opening.

15. If desired, add elastic across middle front portion of the shirt. I find this decreases the amount of fiddling I have to do to get the shawl neck to lay right.

16. Hem sleeves, and hem the bottom, and you're done!
Anyways, here's the finished product:


Overall I am very happy with the result. I think it would be slightly better made out of sturdier knit. The front twist pulls at the back a bit, and I think the addition of some elastic across the back to act as a countering force would help, but with my semi-sheer fabric I didn't think it would look good.
I plan to make another version with a narrower neck band, made out of woven fabric rather than knit, so that all the fullness is in the front lower piece. I think this will give it a bit of a kimono-like look. We'll see how it goes!

Comments
Post a Comment